How to Add PHP in WordPress: A Complete Guide
PHP runs 74% of all websites where the server-side language is known, including WordPress. If you want to customize how your site works, extend plugin features or change how your theme behaves, you’ll be working with this scripting language.
Read this guide to understand how to run PHP code in WordPress safely. We’ll also introduce a handy tool to help you catch PHP issues before they cause real problems.
TL;DR: How to Add PHP in WordPress
Before adding PHP code, always backup your site and be mindful of PHP version compatibility. You can add PHP through:
- Plugins – The safest method that preserves code through updates
- Functions.php – Traditional approach but requires a child theme to prevent losing changes
- FTP access – Most control but requires technical knowledge
Common errors include syntax errors (blank screens), fatal errors (specific error messages), and logic errors (incorrect behavior). Use WordPress Recovery Mode or FTP to fix issues. For ongoing and proactive monitoring, use plugins like WP Umbrella to track PHP errors, security vulnerabilities, SSL expiration, uptime, and visual changes.
Always document your code, follow WordPress coding standards, prefix functions to avoid conflicts, and test incrementally for the best results.
What You Should Know Before Adding PHP to WordPress
Custom PHP code becomes necessary when you need to modify how existing plugins or themes work. You could add functionality that isn’t available through plugins, create custom integrations between different parts of your site, or override WordPress default behaviors. These are all situations where dropping in a bit of PHP code can save you from installing yet another plugin.
With that said, you must be careful when editing PHP. Even a small mistake in your code, like a missing semicolon or an extra bracket, can take your site down completely. This happens because whenever your site loads a post, it pulls data from a database or processes a form. PHP does this work behind the scenes. In the worst cases, you’ll find yourself locked out of the admin dashboard, and fixing the problem will require direct access to your server files.
That’s why you should always back up your site before adding any PHP code to your WordPress site. With a backup in place, test your code in a staging environment to catch problems. Staging ensures your code works as expected in a setup that closely mirrors production and minimizes bugs, integration problems, and negative user experiences once the code is live. You can also consider using plugins that validate syntax before execution to prevent many common errors that crash sites.
Additionally, be mindful of PHP version compatibility when writing custom code.
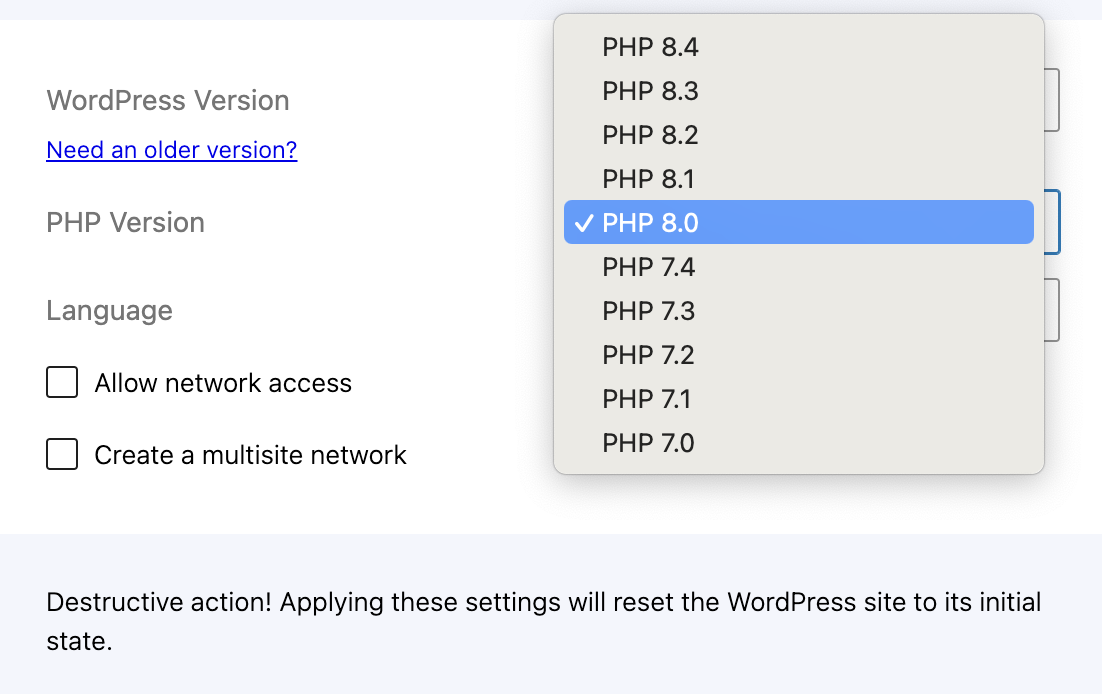
WordPress installations run on various PHP versions (from 7.4 to 8.4), and there are significant syntax and function differences between major versions. Code that works perfectly on PHP 7.4 might throw errors on PHP 8.1 due to deprecated functions or changed behavior. Always check which PHP version your hosting environment uses and write code compatible with that version.
When sharing code with others, include PHP version requirements in your documentation. This is especially important as the PHP language continues to develop, with PHP 8.x introducing stricter type-checking and removing previously deprecated features.
Also, remember to keep your code organized with comments so you’ll understand what it does months later when you inevitably revisit it. And make sure you know the basics of FTP access because when PHP errors lock you out of WordPress, direct file access is the only fix.
Also read: How to turn off PHP Errors in WordPress
Methods to Add PHP to WordPress
1. Using Plugins
Anyone can add PHP to WordPress using plugins. This is the safest and most convenient way. These plugins let you add, edit, and manage PHP code without directly modifying core files, themes, or plugins.
For instance, you can use the Code Snippets plugin to safely add custom PHP code to your site—without editing your theme’s functions.php file. It’s a cleaner, safer way to run small bits of custom code (like tweaks, filters, or actions) to change how your site works.
Usually, to add PHP using plugins, you need to install and activate the plugin and look for an option to add a new snippet or code block. When creating a new snippet, you’ll typically need to select PHP as the code type, name your snippet (use a descriptive name that can help you identify its purpose later), and add your PHP code in the code editor. Verify your code is formatted correctly before saving.
Most quality plugins will validate your PHP syntax to prevent errors that could break your site. Once satisfied with your code, save and activate the snippet to make it live on your site.
2. Adding PHP via functions.php
For those comfortable working directly with theme files, adding PHP to the functions.php file is a traditional approach. This file allows you to add functionality without creating a separate plugin.
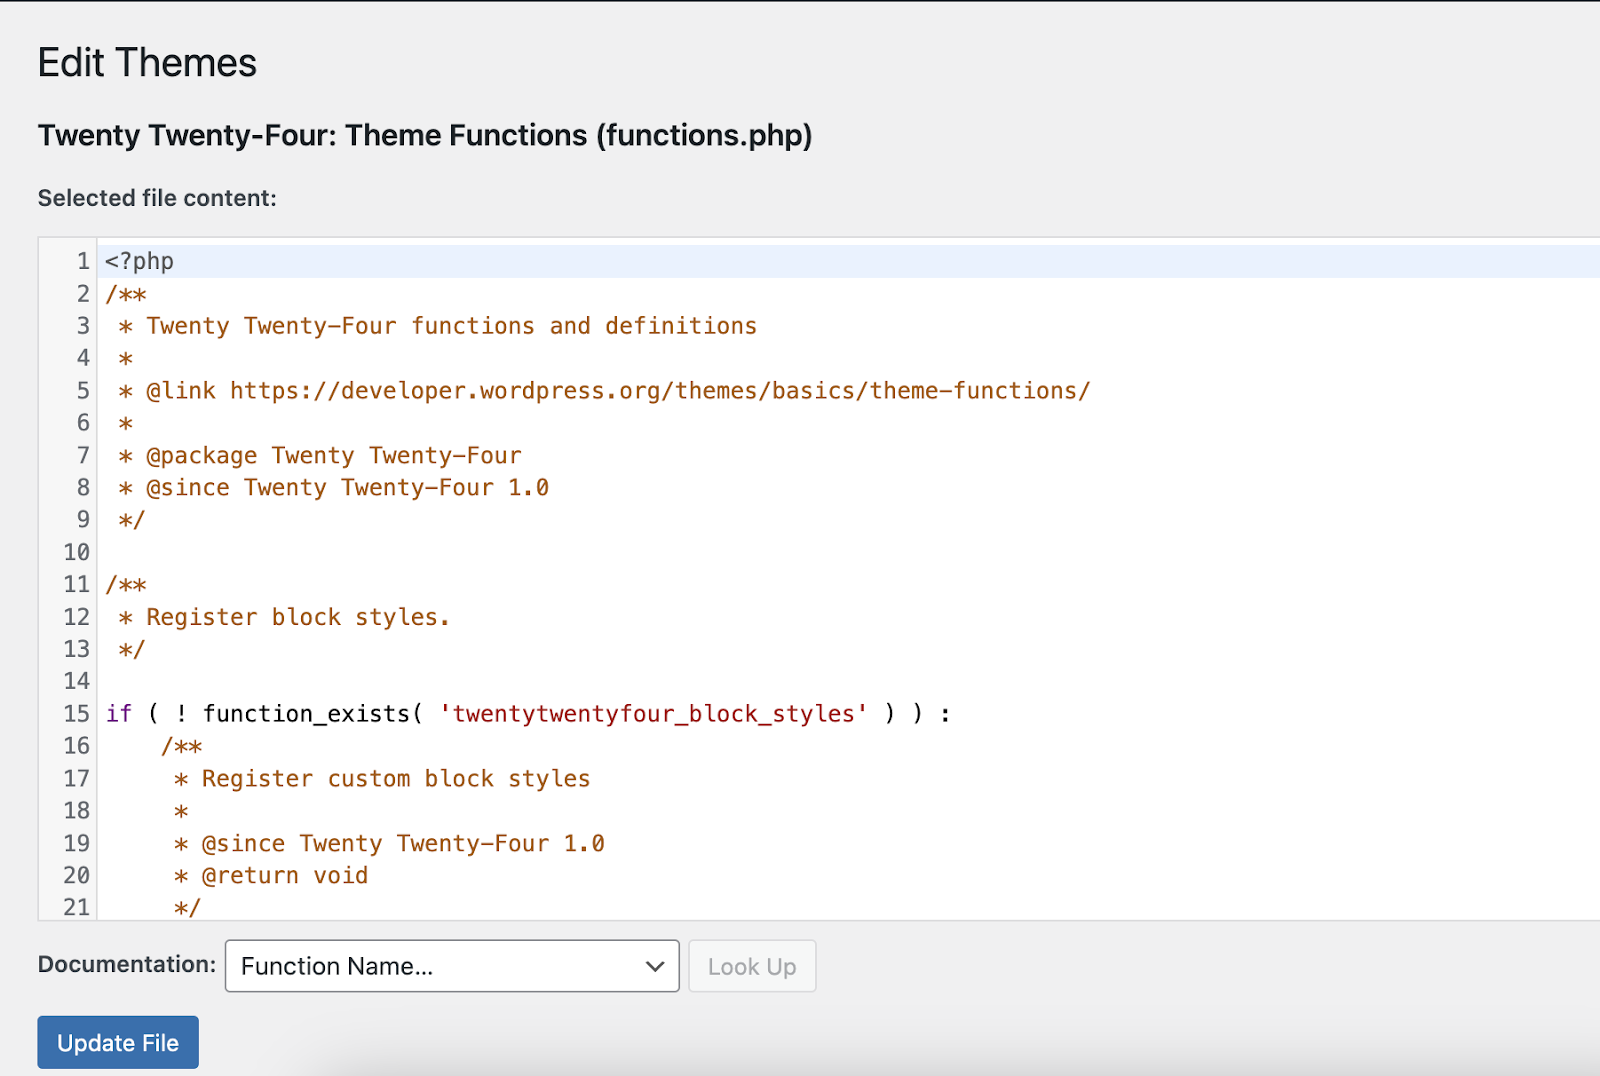
To access your functions.php file, go to Appearance > Theme Editor in your WordPress dashboard. Select your theme (ideally a child theme) and locate functions.php in the list of files on the right. When adding code to this file, always place it at the bottom to avoid conflicting with existing functions.
Unlike plugin solutions, you’ll need to include the opening <?php tag if it’s not already there at the top of your file. After adding your code, click Update File to save your changes. Modern WordPress includes a basic safety mechanism that attempts to revert changes if it detects fatal PHP errors, but this isn’t foolproof.
The main disadvantage of this approach is that your code will be lost when you update or change your theme unless you’re using a child theme. Additionally, a syntax error here will affect your entire site since functions.php loads on every page request.
Related: How to Fix a Parse Error: Syntax Error, Unexpected End of File in WordPress
3. Using FTP for Advanced PHP Editing
The FTP method provides the most control for developers who prefer using professional code editors and want complete access to WordPress files. This approach involves accessing your server files directly through an FTP client like FileZilla.
To use this method, you’ll need your FTP credentials from your hosting provider. Once connected, navigate to your WordPress installation directory and locate the wp-content folder containing your themes and plugins. From here, you can edit any PHP file using your preferred code editor.
The FTP method gives you several advantages: you can use advanced code editors with syntax highlighting, error checking, and autocompletion; you can modify any file in the WordPress system; and you can quickly restore backups if something goes wrong.
However, this power comes with responsibility. There’s no built-in validation, so errors in your code will directly impact your site. Always keep a backup connection open when making changes to fix problems if your site goes down quickly.
For theme customizations, focus on the child theme directory to preserve your changes during updates. When modifying plugins, remember that your changes will be overwritten when the plugin updates, so document your modifications carefully.
Real-World Examples of PHP in WordPress
Now that you understand the different methods for adding PHP to WordPress, let’s look at some practical examples. These snippets solve common problems and can be implemented using any of the methods discussed earlier.
1. Modifying WordPress Core Behavior
Here’s a snippet that changes the number of posts displayed on archive pages:
php
function modify_posts_per_page($query) {
    if (!is_admin() && $query->is_main_query()) {
        if (is_category() || is_tag() || is_date()) {
            $query->set('posts_per_page', 12);
        }
    }
}
add_action('pre_get_posts', 'modify_posts_per_page');
This code hooks into WordPress before it queries posts and changes the number shown on category, tag, and date archive pages to 12. The hook only affects the main query and won’t change results in widgets or custom queries elsewhere on your site.
2. Creating Custom Shortcodes
Shortcodes let you add dynamic content anywhere in your posts or pages. Here’s an example that displays different content based on whether a user is logged in:
php
function conditional_content_shortcode($atts, $content = null) {
    $attributes = shortcode_atts(
        array(
            'logged_in' => '',
            'logged_out' => '',
        ),
        $atts
    );

    if (is_user_logged_in() && !empty($attributes['logged_in'])) {
        return $attributes['logged_in'];
    } elseif (!is_user_logged_in() && !empty($attributes['logged_out'])) {
        return $attributes['logged_out'];
    }

    return $content;
}
add_shortcode('user_content', 'conditional_content_shortcode');
You would use this shortcode like this:
[user_content logged_in="Welcome back!" logged_out="Please log in to access this content."] The appropriate message will display based on the user’s status.
3. Customizing Admin Functionality
Sometimes, you want to customize the WordPress admin area. This snippet adds a custom dashboard widget with important information for your site editors:
php
function custom_dashboard_widget() {
    echo '<p>Welcome to the site dashboard! Before publishing content, please:</p>
    <ul>
        <li>Check that all images have alt text</li>
        <li>Preview the post on mobile devices</li>
        <li>Add at least one category and three tags</li>
    </ul>
    <p>For assistance, contact the admin at: admin@example.com</p>';
}

function add_custom_dashboard_widget() {
    wp_add_dashboard_widget(
        'custom_help_widget',
        'Publishing Checklist',
        'custom_dashboard_widget'
    );
}
add_action('wp_dashboard_setup', 'add_custom_dashboard_widget');
This creates a widget with a publishing checklist visible to anyone accessing the dashboard.
When implementing these examples, remember to adjust them. Modify variable names, values, and function behaviors to work with your unique WordPress configuration.
Troubleshooting PHP Errors in WordPress
Even experienced developers make mistakes when adding PHP to WordPress. Knowing how to identify and fix these errors quickly can save you hours of frustration and prevent extended site downtime.
Common PHP Errors You’ll Encounter
Syntax errors are the most frequent problems when adding PHP to WordPress. These occur when your code structure violates PHP rules—missing semicolons, unmatched brackets or parentheses, or unclosed quotes. These errors typically trigger the dreaded “white screen of death,” where your site displays nothing but a blank page.

Fatal errors occur when PHP understands your syntax but encounters a problem during execution. This might happen when you call a function that doesn’t exist, try to use a class that isn’t available, or attempt to access an undefined variable in a way that breaks execution. Many fatal errors include specific error messages that help identify the problem.
Logic errors are the most challenging to diagnose since your code runs without errors but doesn’t produce the expected results. These might appear as styling issues, missing content, or features that partially work but behave incorrectly.
WordPress Recovery Mode
Recent WordPress versions include a recovery mode feature that activates when critical PHP errors are detected. If WordPress detects a problem serious enough to affect admin access, it will email the site administrator with a special recovery link. This link lets you access the admin area in a limited mode where problematic plugins or themes are temporarily disabled.
Once in recovery mode, you can access the theme or plugin editor to fix the offending code. WordPress will identify which file and often which line contains the error, making troubleshooting much faster. After fixing the problem, you can exit recovery mode, and your site will return to normal operation.
If you don’t receive a recovery mode email or can’t access it, you’ll need to use FTP to fix the problem manually.
Fixing PHP Errors via FTP
When a PHP error locks you out of WordPress completely, FTP becomes your rescue tool. Connect to your server using your FTP credentials and navigate to the location of the file you recently modified. If you can’t remember which file caused the problem, check your server’s error logs (usually accessible through your hosting control panel) for clues.
Once you’ve identified the problematic file, download a copy as a backup, then edit the file to fix the error. The simplest solution is often to revert to a previous working version or comment out the new code entirely using /* and */ around the problematic section. After making your changes, upload the fixed file back to the server.
For issues with plugins or themes installed from the WordPress repository, you can alternatively rename the plugin or theme folder via FTP to disable it completely. For example, changing “plugin-name” to “plugin-name-disabled” will prevent WordPress from loading it, often restoring access to your admin area.
Using Error Logs
WordPress error logs provide valuable information when troubleshooting PHP problems. To enable detailed logging, add this line to your wp-config.php file:
php
define('WP_DEBUG', true);
define('WP_DEBUG_LOG', true);
define('WP_DEBUG_DISPLAY', false);
This configuration writes all PHP errors to a debug.log file in your wp-content directory without displaying them to site visitors. After enabling debug logging, reproduce the error, then check the log file for specific information about what went wrong and where.
Remember to disable WP_DEBUG on production sites after resolving your issues, as debug logs can grow large and potentially expose sensitive information about your site’s structure.
Related: How to Use WordPress PHP Error Logs for Troubleshooting (Guide)
Best Practices for PHP in WordPress
1. Document Everything
Well-documented code is the gift you give your future self. For every PHP snippet you add to WordPress, include comments that explain what the code does, why it’s necessary, and any dependencies it has. Use PHP’s standard comment formats:
php
// This is a single line comment

/*
 * This is a multi-line comment
 * that continues here
 */

/**
 * Function documentation in DocBlock format
 *
 * @param string $example Parameter description
 * @return bool Returns true if successful
 */
Document not just what the code does but any assumptions it makes about theme structure, plugin compatibility, or WordPress versions. These notes will be invaluable when you revisit this code months later, or when another developer inherits your site.
2. Follow WordPress Coding Standards
WordPress has established coding standards that make PHP more consistent and readable.
These include:
- Using tabs for indentation, not spaces
- Naming functions with lowercase letters and underscores
- Always including braces for conditional statements and loops
- Adding spaces after commas and around operators
Beyond readability, following these standards ensures your code works well with WordPress core functions and integrates cleanly with other plugins and themes. The WordPress Coding Standards documentation provides comprehensive guidelines for writing WordPress-compatible PHP.
3. Prefix Your Functions
WordPress loads code from multiple sources, including core files, plugins, and themes, into the same PHP environment. This creates the risk of function name collisions, where two distinct pieces of code try to declare functions with identical names.
To avoid this problem, prefix all your custom functions with a unique identifier related to your site or project:
php
// Instead of this
function add_custom_styles() {
    // Function code
}

// Do this
function mysite_add_custom_styles() {
    // Function code
}
This simple naming convention dramatically reduces the chance of conflicts with current or future plugins.
4. Check If Functions Exist
Before declaring a function, check if it already exists to prevent fatal errors:
php
if (!function_exists('mysite_custom_function')) {
    function mysite_custom_function() {
        // Function code
    }
}
This defensive coding approach means your site won’t crash if the same function is accidentally declared twice, either in your code or through a plugin conflict.
5. Use Child Themes for Theme Modifications
If you’re adding PHP that modifies theme functionality, always use a child theme rather than editing the parent theme directly. This preserves your custom code when the parent theme updates, preventing the dreaded situation where your customizations vanish after an update.
Creating a child theme is straightforward—create a new directory in wp-content/themes with a style.css file that references the parent theme, and add your functions.php with custom code. WordPress officially documents this process in detail.
6. Test Progressively
When implementing complex PHP functionality, don’t write everything at once. Add code in small, testable increments, verifying each piece works before moving to the next. This approach makes debugging significantly easier since you’ll quickly identify which addition caused a problem.
A good testing sequence is:
- Add the basic function structure and verify it doesn’t break anything
- Implement core functionality and test with simple inputs
- Add error handling and edge case management
- Optimize for performance if needed
By following this progressive implementation approach, you’ll catch issues early when they’re still simple to fix.
Monitoring PHP Errors with WP Umbrella
Forget digging through endless debug.log files.
WP Umbrella watches your site’s PHP in real-time. When it detects an issue, it immediately alerts you via email or Slack, often allowing you to fix problems before visitors notice them.
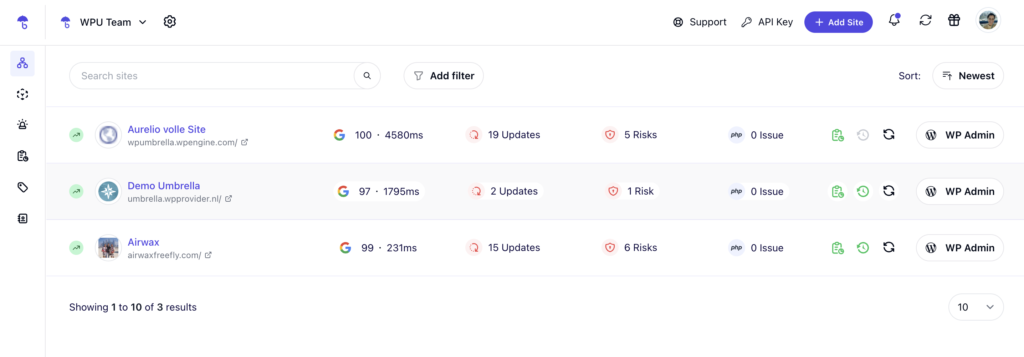
In addition to monitoring PHP errors, it also covers several other useful features, including
- Security checks every six hours. WP Umbrella compares your active plugins and themes against the latest security advisories and alerts you when risk appears.
- SSL certificate monitoring that warns you long before expiry stops secure traffic.
- Uptime and performance tracking from multiple locations. If your site goes down, you get an instant alert and a timeline of the outage.
- Backup and restoration: GDPR-compliant incremental backups with flexible scheduling and one-click restoration.
- Visual change detection after updates. If a layout shifts or an element disappears, you can roll back without waiting for a customer complaint.
Why it matters:
- Proactive protection: stop fatal errors from taking the whole site down.
- Centralized oversight: agencies can watch dozens of sites from one screen instead of logging into each server.
It’s safer than leaving WP_DEBUG_DISPLAY on in production and miles faster than waiting for clients to email you a screenshot.
Setting up WP Umbrella takes just minutes—install the plugin, connect it to your WP Umbrella account, and configure notification preferences. The plugin provides peace of mind that your WordPress site is continuously monitored for any issues affecting performance or security. Try it for free for 14 days!
FAQs On Adding PHP in WordPress
It depends on how you’ve added it. Code in snippet plugins or child themes will persist through updates. PHP added directly to parent themes or core files will be overwritten during updates.
Functions.php code is tied to your current theme and will stop working if you switch themes. Plugin-based code works regardless of which theme you’re using.
Enable WordPress debug mode by adding these lines to wp-config.php:
php
define(‘WP_DEBUG’, true);
define(‘WP_DEBUG_LOG’, true);
define(‘WP_DEBUG_DISPLAY’, false);
Then check the debug.log file in your wp-content folder for error messages.
When using plugins, you typically don’t need to include the opening <?php tag. When editing theme files directly, you’ll need to include it unless the file already starts with PHP code.
Always review code from external sources before adding it to your site. Malicious code can compromise your WordPress installation. Stick to reputable sources and understand what the code does before implementing it.
Sources: