How to Use WordPress PHP Error Logs for Troubleshooting (Guide)
WordPress error logs started guide: All what you should know to set up and access WordPress error logs.
If you are trying to understand how the WordPress error logs works, you are in the right place!
WordPress PHP error logs are useful to identify and fix PHP issues in your website. Error logs help you troubleshoot bugs, identify plugin conflicts, and performance problems by recording PHP-related errors that occur on your site.
If not fixed, PHP errors & warnings can reduce your website performance and increase your website vulnerability to downtime and hackers.
This guide will show you how to enable PHP error logs in WordPress and help you understand how to read and interpret them, so you can catch and prevent common issues down the road.
Let’s get started!
TL;DR About The WordPress PHP Error Logs
- A WordPress website can be affected by a variety of errors, including permission issues and PHP issues. If you don’t have any technical experience, it can be challenging to diagnose these problems on your site.
- You can turn your wp-config.php file into a debugging tool by adding a few lines of code. Once you’ve identified the problem, it will be easier to troubleshoot it.
- To activate WordPress error logs add define( ‘WP_DEBUG’, true ); above “Stop editing! Happy blogging”. in wp-config.php file.
What Are PHP Errors in WordPress?
PHP is the coding language WordPress is built on. When a user requests a web page that contains PHP code, the code is processed by the PHP module (Apache or Nginx) installed on the server.
Processing a request can generate PHP errors. This means that something is wrong with the PHP code. The error can be as simple as a missing semicolon, or as complex as calling an incorrect variable.

PHP errors can occur due to various factors
PHP errors can occur due to various factors, including your theme, plugins, database, or even server configuration. Overloading your WordPress website with plugins can increase the likelihood of these errors.
Note that, most PHP errors that you can see on your WordPress site are usually warnings and notices and they are not critical. This being said, some of them (fatal errors, internal server error, etc) can stop your website from loading and it’s important to monitor everything so things don’t escalate.
PHP error monitoring, uptime monitoring, safe update and automated backups
Install WP Umbrella on your websites in a minute and discover a new way to manage multiple WordPress sites.
Get Started for free
Why Are WordPress PHP Error Logs Important?
Indeed, even if your website seems to be working well, it may in fact be suffering from undetected PHP errors that should be fixed ASAP. The WordPress error log gives you the list of these errors.

Error logs provide you with information such as the error type, the error line, and the file concerned. You should use WordPress error logs to troubleshoot arising issues or understand why they’ve happened.
If the errors are coming from a third-party plugin, you should open a ticket on WordPress support forum.
If my explanation still looks blurry and if you don’t see the point of enabling the debugging mode for WordPress, here are some situations where you might really need it:
- When your WordPress website doesn’t load (blank page);
- When your web browser displays a warning with a PHP error code;
- If a plugin isn’t working properly;
- In case of downtime;
- If your website is really slow;
- If you want to improve your website performance & security;
Step-by-Step Guide to Enabling and Viewing PHP Error Logs in WordPress
There are two ways to access PHP error logs in WordPress: manually or with a monitoring plugin. I’d personally advise to use WP Umbrella to monitor your PHP errors. It’s clearly the easiest way.
Method 1: Monitor WordPress PHP errors logs with a plugin
Step 1: Get WP Umbrella Monitoring Plugin
WP Umbrella is a all-in-one solution to manage WordPress sites. It embed a PHP errors monitoring feature for WordPress.
WP Umbrella is interesting because it also checks your website’s uptime rate and provide you with automatic backups, security monitoring and much more..!
You need to install the plugin, create an account and connect your API key.

Step 2: Go to the PHP errors monitoring tab
Then, go to WP Umbrella’s application >> PHP issues.

From here, click on the “view error” to get all the information related to the PHP errors such as:

- The type of PHP error
- The plugin or theme responsible
- The environnement information (PHP version, plugin version, WordPress version)
- When the PHP error happened
That’s it, easy peasy!
Method 2: Enable PHP Error Logging in WordPress Manually
If you don’t want to use an error log plugin like WP Umbrella or Query monitor, you can enable WordPress error log and retrieve PHP errors from here.
Step 1: Access the wp-config.php file
The wp-config.php file contains important WordPress settings like how to connect to your database. This is the file you need to edit in order to enable WordPress debugging mode and access WordPress error logs where you will find your PHP errors.
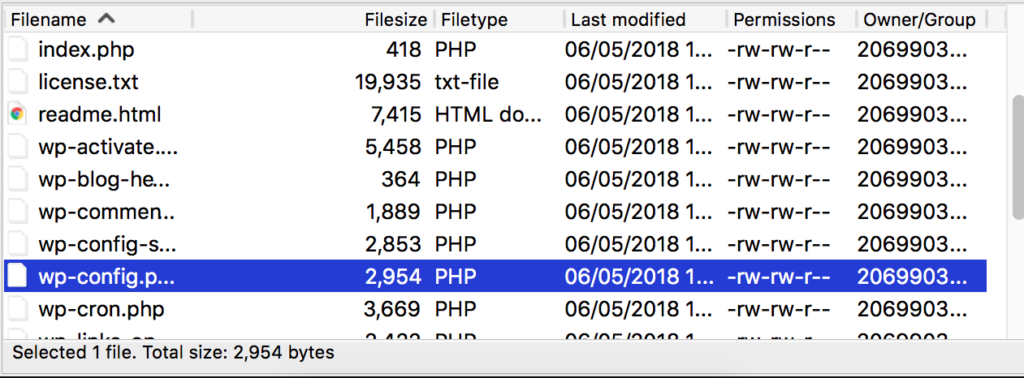
First, you need to connect to your website using an FTP client. Then, download the wp-config.php file to make a backup of it. Then you can start editing it with your favorite HTML editor.
Step 2: Edit the wp-config.php file

Just before the line “That’s all, stop editing! Happy blogging” add this:
define( ‘WP_DEBUG’, true ); define( ‘WP_DEBUG_LOG’, true );Or write true instead of false if the WP_debug function is already defined.
WP_DEBUG will allow you to enable debug mode and WP_DEBUG_LOG will allow you to send all errors to a file, so PHP errors are not displayed on your pages.
Save your changes and upload the file back to your website.
Step 3: Locate and Access the Debug Log
The errors will then get logged to the debug.file within your wp-content folder. If you don’t see the file, you can create one:
- Navigate to wp-content Directory:
- Find debug.log
- Look for debug.log. If PHP errors have been logged, this file will contain detailed error information.
- Download and open the file:
Download debug.log to view it in a text editor, or open it directly if your file manager supports viewing files. The debug.log file provides specific error messages and the files or plugins causing them, making it easier to troubleshoot.

Useful Stats and Data
According to a survey by WPBeginner, over 63% of WordPress users have encountered some form of PHP error. Also, WordPress forums are filled with approximately 23% of threads related to PHP error issues in WordPress.
Common PHP Errors and How to Fix Them
Understanding PHP error logs can help you address issues on your site. Here are the most common errors and what they mean:
- Syntax Errors:
Example: Parse error: syntax error, unexpected ‘}’
Solution: This error indicates a typo in the code, like a missing bracket or semicolon. Check your recent edits to your theme or plugin files.
- Deprecated Functions:
Example: Deprecated: Function get_magic_quotes_gpc() is deprecated
Solution: Deprecated functions are older code that’s no longer supported in the latest PHP versions. Update plugins or themes, and use PHP-compatible replacements.
- Memory Limit Errors:
Example: Fatal error: Allowed memory size of X bytes exhausted
Solution: Increase the PHP memory limit defined in your wp-config.php file.
How to Fix The PHP Errors That You Found in The Error Log?
Regrettably, there’s no magic and universal approach to fixing issues that you discovered in your WordPress website’s error log. Every PHP error will need to be troubleshot on its own.
Here’s a breakdown of steps you can take:
- Understand the Error: Go through your WordPress PHP error log to grasp the issue fully.
- Plugin and Theme Issues: If the problem is caused by a plugin or theme, it’s best to reach out to the respective support team.
- Consult PHP Documentation: For complex issues, you might need to delve into official PHP documentation.
- Rollback Updates: Sometimes updates can cause issues. Rolling back to a previous version can sometimes fix the issue while you await an official patch.
For advanced monitoring and automated backups, WP Umbrella provides essential tools to help you manage and protect your WordPress site.
We hope this article helped you to understand the WordPress error logs so you can troubleshoot your PHP issues!
Frequently Asked Questions About WordPress PHP Error Log
The WordPress PHP error log is usually located within the wp-content folder.
You can use plugins like WP Umbrella or manually edit your wp-config.php file.
Identify the issue using the PHP error log and then either disable the problematic plugin/theme or consult technical support on WordPress.org