How to Solve the “WordPress Memory Limit Exhausted” Error – A Complete Guide
Everything you need to know about the PHP memory limit in WordPress and how to easily increase it to fix the allow memory size exhausted error.

Getting the “Allowed Memory Size Exhausted” error in WordPress?
The WordPress Memory Limit Exhausted error, also known as the “WP memory limit” error, occurs when your sites requires more PHP memory than it’s allocated by the server.
This error is common on shared hosting plans but can easily be fixed by increasing the wp memory limit.
This comprehensive guide is aimed at teaching you everything there is to know about WordPress PHP memory limits, including how to permanently fix that “allow memory size exhausted” error.

Let’s get started!
Understanding WordPress Memory Limit Exhausted Errors
WordPress is written in PHP, and relies on server-side memory to function. Just like a regular computer, web servers need memory to run multiple applications simultaneously. PHP is allocated a specific amount of memory to function, set by your hosting provider.
The WordPress Memory Limit Exhausted Error occurs when WordPress needs more memory than it’s been allocated. These errors are more likely to happen on shared servers.
What Causes the WordPress Memory Limit Exhausted Error?
Before blindly increasing your PHP memory limit in WordPress, it’s essential to identify what’s causing the issue.
Your memory issues may be caused by more than simply available space – adding more memory will only be a temporary fix – you’ll continue to see the same wp memory limit error if you don’t fix the cause of it.
WP Memory limit issues are most often caused by two factors:
- Heavy Media: Your PHP memory is directly affected by the media you upload. Consistent uploads of videos and high definition images can strain your server resources. Which is one of the reason why you should always compress your media in WordPress.
- Poorly Coded Plugins: Some themes and plugins are not optimized at all, leading to excessive memory usage.
- Resource-heavy plugins: Plugins that perform intensive tasks like backups or image optimization can deplete memory.
Ready to boost your productivity, impress your clients and grow your WordPress agency?
Install WP Umbrella on your websites in a minute and discover a new way to manage multiple WordPress sites.
Get Started for free
Step-by-Step Guide to Increasing the PHP Memory Limit in WordPress

Expert Tip
Want a seamless WordPress experience without any PHP memory error? Run away from shared hosting and take a dedicated or managed hosting plan that allows for easy PHP memory limit adjustments.
Method 1: Increase Memory Limit via wp-config.php
Changing the WordPress memory limit requires editing the wp-config.php file. The file can be downloaded from the public_html folder of your site.
- Download the
wp-config.phpfile from thepublic_htmlfolder of your site. - Open it with an HTML editor.
- Look for the the line that reads, ‘That’s all, stop editing! Happy blogging.’
- Add the following code just above it:
define( 'WP_MEMORY_LIMIT', '256M' );
This tells WordPress that it can use up to 256MB of PHP memory instead of the default limit. Save and upload the file back to your server.
Check the WordPress site again and the memory exhausted error should have disappeared. If it has not worked, you need to contact your hosting provider support.
Mathod 2: Contacting Your Hosting Provider
If editing the wp-config.php file didn’t fix the issue, you will need to contact your hosting provider to request a WP memory limit increase.
When you’re on a shared hosting plan, the server’s resources (bandwidth and memory) are shared among multiple users. Boosting the PHP memory limit for one site could deprive other sites of resources they need so hosting providers often place caps to ensure fair distribution and/or increase their profitability, and your only option is available is to contact them.
Preventive Measures to Avoid Memory Exhaustion in WordPress
Taking few preventive steps can help you avoid memory-related issues in the future and boost your site performance:
1. Limit Plugin and Theme Usage
Only use essential plugins and choose themes from reputable sources. Poorly coded plugins and themes can quickly drain memory and not only cause the wp memory limit error but also affect your site health.
2. Optimize Media Before Uploading
Always use an image compression plugin to reduce file sizes before uploading. In addition, consider using a CDN to store and deliver images faster.
3. Upgrade Hosting if Needed
If your site consistently runs into PHP memory issues, consider upgrading to a higher-tier hosting plan. A VPS or managed hosting plan offers more control over server resources, which can reduce memory errors in WordPress.
4. Regularly Monitor Site Health
Use tools like WP Umbrella to monitor and secure your site. Regular monitoring helps you detect potential memory issues early so you can fix them before they escalate.
FAQ: WordPress Memory Limit Exhausted Error
What causes the memory limit exhausted error in WordPress?
This error occurs when WordPress needs more memory than allowed, often due to resource-intensive plugins, large media files, or low server memory allocation.
The default PHP memory limit in WordPress is 32MB, which is usually fine for smaller sites, but will not work as soon as you add more content to your website. The available memory will automatically increase to 40MB when this limit is reached, such as when you upload heavy media such as a movie. If you still surpass this limit, you’ll see the “Allowed Memory Size Exhausted” error.
A memory limit of 128M to 256M is generally safe and sufficient for most WordPress sites. However, large sites may require more, and the wp memory limit can be increased up to 512M.
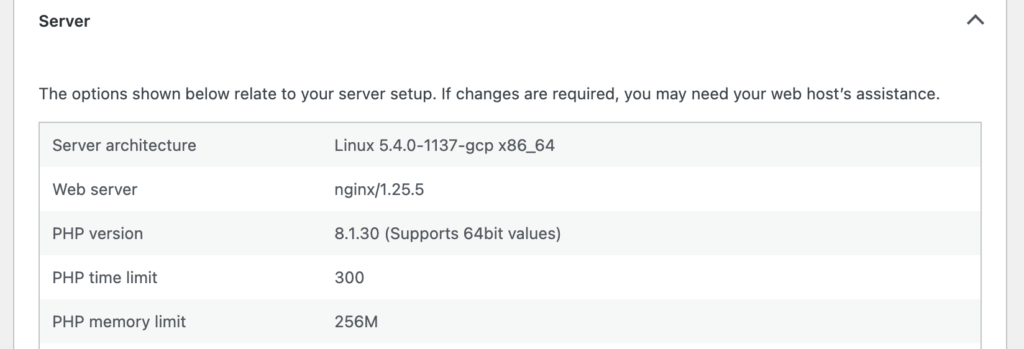
Go to Tools > Site Health > Info in your WordPress dashboard and expand the Server section to see the current PHP memory limit.
Final Thoughts
We hope this article helped you to understand how the memory limit is managed in WordPress and that you were able to fix your issue.
If you still find yourself hitting a wall even after attempting to adjust the PHP memory limit in WordPress, your only option might be to either upgrade your hosting plan or switch to a hosting provider that offers more flexibility.
For more information on hosting-related issues, read How to Fix The 502 Bad Gateway Error in WordPress.