WordPress REST API: Get All Posts (2026 Guide)
Unlock the full potential of WordPress REST API & learn the secret to accessing all posts without hitting the limit & find solutions to common!
The WordPress REST API lets external applications read, create, update, and delete WordPress content using HTTP requests. By default it returns 10 posts per page, with a hard ceiling of 100. For developers managing sites with thousands of posts, that limit becomes a problem fast.
This guide covers three pagination workarounds, the four authentication methods you’ll need to choose between, and the most common errors developers hit when building against the REST API. Code examples in both JavaScript and PHP, ready to copy and adapt.
This guide was updated for WordPress 7.0, WordPress 6.8 and Application Passwords.
What is the WordPress REST API?
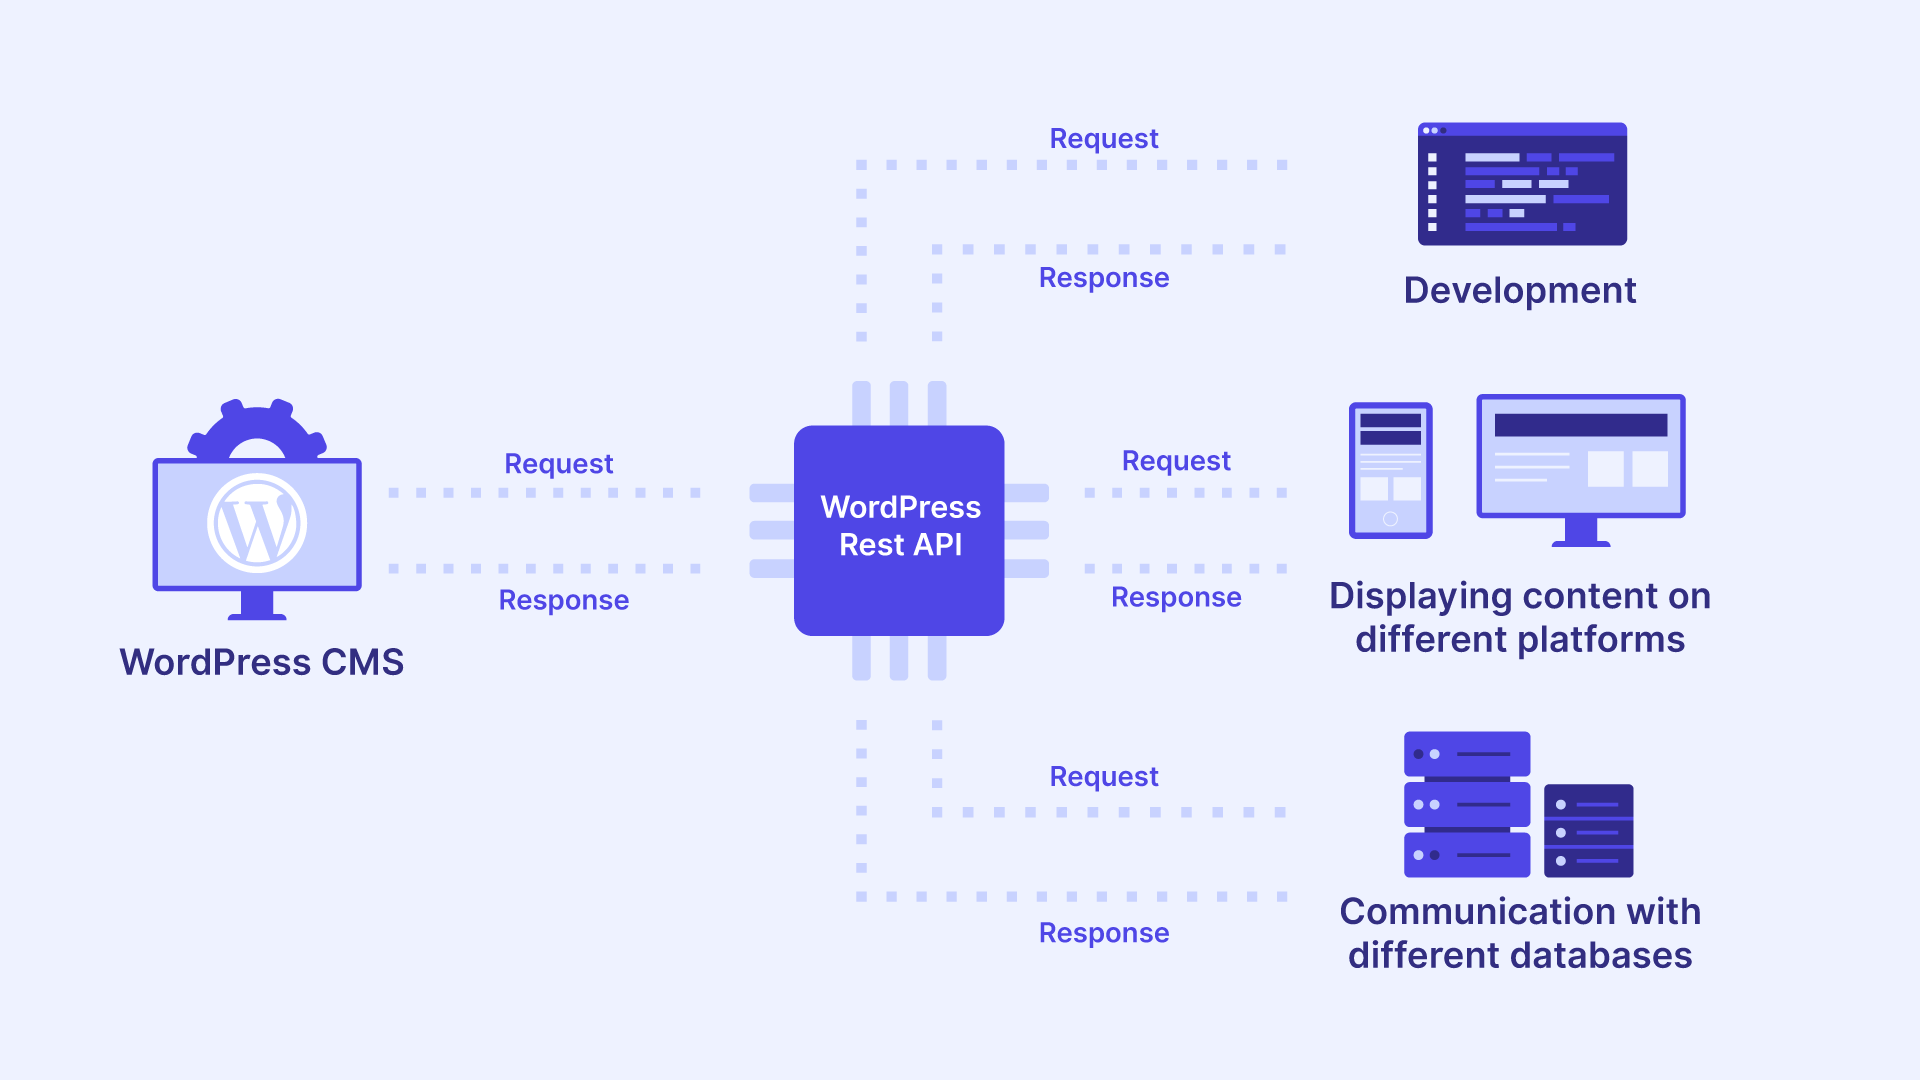
The WordPress REST (Representational State Transfer) API (Application Programming Interface) enables developers to interact with WordPress using standard HTTP methods and protocols. It enables external applications, websites, and services to programmatically access and manipulate WordPress content, such as posts, pages, users, and more, over the internet.
Imagine your website as a library, filled with an extensive collection of books, each representing a piece of content. In this scenario, the REST API acts as the librarian who can fetch, organize, and provide you with any book you need, regardless of where it’s stored or what format it’s in. This interaction is facilitated through the sending and receiving of JSON (JavaScript Object Notation) objects.
That’s why the WordPress REST API is such a powerful asset for tech-savvy website owners and developers.
Tip: WordPress provides developer resources that include a comprehensive explanation of the ins and outs of the REST API and its workings.
Ready to grow your WordPress agency?
Install WP Umbrella on your websites in a minute and discover a new way to manage multiple WordPress sites.
Get Started for free
Why use the WordPress REST API?
- Versatility and automation: The WP REST API allows developers to perform a wide range of actions, including creating, reading, updating, and deleting posts, pages, and other types of content without even logging into the WordPress dashboard. This flexibility opens up a world of possibilities for developers, enabling them to build more dynamic, interactive, and robust websites.
- Enhanced WordPress development: With the REST API, you can build and manage WordPress sites using any programming language capable of sending HTTP requests and interpreting JSON. You won’t be limited to PHP; you can use JavaScript, Python, or any other language you’re comfortable with, which is especially empowering for modern web development.
- Integration: Seamlessly integrate your website with other applications, services, or platforms. Whether it’s connecting to a customer relationship management (CRM) system, an eCommerce platform, or a mobile app, the REST API makes it possible.
- Customization: You can use this API to create custom applications, themes, and plugins that extend the functionality of your WordPress site.
- Authentication and security: Ensure secure data transmission and access control by implementing authentication mechanisms like OAuth2.0.

To fully capitalize on the potential of the WordPress REST API, it’s essential to understand some key terminology:
What are routes and endpoints in the WordPress REST API?
These are the URLs that the API exposes for interacting with your WordPress site.
Each route corresponds to a specific resource, such as:
- Posts (/wp/v2/posts).
- Pages (/wp/v2/pages).
- Custom post types.
Each endpoint, then, corresponds to a specific action you can take on that resource, like:
- Reading.
- Creating.
- Updating
- Deleting.
How do WordPress REST API requests work?
These are the HTTP requests that you send to the REST API to interact with your WordPress site. Each request contains information about what action you want to take and on which resource.
For example, GET /wp-json/wp/v2/posts.
- GET is the HTTP method that indicates that you want to retrieve data.
- /wp-json/wp/v2/ is the base URL for the WordPress REST API.
- posts is the endpoint URL that specifies the resource you want to interact with. In this case, it’s the “posts” resource.
What does a WordPress REST API response look like?
These are the JSON objects that the REST API sends back to you in response to your requests. Each response contains information about the result of your request, such as the data of a post you requested or a message about the success or failure of an update operation.
Here is a very basic JSON response example:
{
  "status": "success",
  "message": "Post retrieved successfully",
  "data": {
    "post_id": 12345,
    "title": "Sample Post",
    "content": "This is a sample post content.",
    "author": "John Doe",
    "timestamp": "2023-09-14T12:00:00Z"
  }
}
What is a WordPress REST API schema?
The schema is a blueprint that defines the structure of the JSON objects that the REST API uses in requests and responses. It’s a vital component for ensuring consistent data exchange and interoperability between different systems.
It defines what fields each object can have and what types of values those fields can contain.
What are controller classes in the WordPress REST API?
Controller classes are the PHP classes that the REST API uses to handle requests and generate responses. They play a crucial role in managing and processing incoming HTTP requests and generating appropriate responses.
Each controller class corresponds to a specific resource and contains methods for handling each type of request that can be made on that resource.
They are responsible for acting as intermediaries between the client (typically a web browser or a mobile app) and the server-side application. They also handle the routing of incoming HTTP requests to the appropriate methods within the controller, ensuring that the requested resource is processed correctly.
For instance, if you have a REST API for managing users, you might have a UserController class with methods like getUser, createUser, updateUser, and deleteUser. These methods handle their respective HTTP request types.
With the knowledge of these components, you can begin to explore the powerful capabilities that this feature offers for WordPress development.
Which HTTP methods does the WordPress REST API use?
When working with the WP REST API, there are four primary HTTP methods (or commands) you’ll be using: GET, POST, PUT, and DELETE. Each of these methods corresponds to a particular type of action you can take on a resource.
- GET: Used to retrieve data from the server. It’s the most common method and is used to request data from a specified resource.
- POST: Used to send data to the server to create a new resource by submitting data to be processed to a specified resource such as posts, pages, etc.
- PUT: Used to update existing data on the server. It replaces all current representations of the target resource with the uploaded content.
- DELETE: Used to delete existing data on the server by removing all current representations of the target resource specified in the URL.
The structure and design of your application will influence how these methods are used. The interactions between different components, the overall architecture, and the context in which your application operates all play a role in how GET, POST, PUT, and DELETE requests are utilized.
The choice between different applications of these HTTP methods, such as via cURL or JavaScript, depends on various factors. These include the context of your application, the environment it runs in, and your familiarity with the technologies to be used.
cURL is a versatile command-line tool that allows you to interact with web services and APIs directly from your terminal or command prompt. For instance, if you’re working on the server side (such as in PHP or Python scripts) or in a shell script environment (Bash, PowerShell, etc.), cURL can be an effective way to make HTTP requests to APIs.
Additionally, many modern web frameworks and libraries provide their own tools for handling HTTP requests and API interactions. For example, in the PHP world, libraries like Guzzle are commonly used for this purpose – but cUrl is still a good alternative.
On the other hand, if you’re building web applications that run in browsers, regular JavaScript along with AJAX (Asynchronous JavaScript and XML) or the newer Fetch API are commonly used for making these HTTP requests.
Here’s a very basic example of retrieving posts from WordPress using JavaScript with the Fetch API:
// Define the API endpoint for retrieving posts
const apiUrl = 'https://your-wordpress-site.com/wp-json/wp/v2/posts';

// Make a GET request to retrieve posts
fetch(apiUrl)
  .then((response) => {
    if (!response.ok) {
      throw new Error(`HTTP error! Status: ${response.status}`);
    }
    return response.json();
  })
  .then((data) => {
    // Process the retrieved data (in this case, a list of posts will be displayed in the console log)
    console.log(data);
  })
  .catch((error) => {
    console.error('Error:', error);
  });
Depending on your WordPress configuration, you might need to handle authentication. By default, some data might be publicly accessible, but for restricted data or actions like creating or updating content, you’ll need to authenticate your requests. You can use authentication methods like OAuth, JWT, or basic authentication, depending on your setup.
How to access all WordPress posts using REST API
The WordPress REST API returns 10 posts per page by default, the same number WordPress shows in the admin posts list. You can change the default number of posts per page in the WordPress settings, or you can specify a different number in the API request. To specify a different number of posts per page in the API request, you can use the per_page query parameter.
For example, the following request will retrieve five posts per page:
https://your-wordpress-site.com/wp-json/wp/v2/posts?per_page=5However, the maximum number of posts that the WordPress API can retrieve per page is 100. This limit is in place to prevent overloading the server with too many requests.
Fortunately, there’s a workaround to this constraint by using pagination.
Pagination refers to the process of dividing a large set of data, such as posts or comments, into smaller, manageable chunks or “pages”. This allows clients, like web applications or mobile apps, to retrieve and display data incrementally rather than fetching the entire dataset in one request.
It is crucial for improving the performance and usability of APIs when dealing with large amounts of data, especially if you know you’ll be going over the limit of 100 retrievals per page.
A tutorial on retrieving all WordPress posts using the REST API and pagination
After familiarizing yourself with the primary endpoint for retrieving posts from a WordPress site, which is https://YOUR_DOMAIN_NAME/wp-json/wp/v2/posts, and the per_page parameter, which allows you to define how many results are retrieved per page, it’s time to implement.
First, you must choose a programming language depending on the needs of your project. In this tutorial, we’ll provide examples of exporting all posts as a backup or for migration purposes, using both JavaScript and PHP.
Using JavaScript
You can use the following sample JavaScript code to retrieve your WordPress posts. It will log your retrieved data in the console – you can adjust the code to add your preferred action (e.g., data analysis, backup, reporting).
// JavaScript for retrieving posts and logging the data in the console.

const apiUrl = 'https://your-wordpress-site.com/wp-json/wp/v2/posts';
const perPage = 10; // Number of posts per page
let allPosts = [];
let currentPage = 1;

async function fetchPosts() {
    try {
        while (true) {
            const response = await fetch(`${apiUrl}?per_page=${perPage}&page=${currentPage}`);
            const posts = await response.json();
            if (posts.length === 0) {
                break; // No more posts, exit loop
            }

            allPosts = allPosts.concat(posts);
            currentPage++;
        }

        displayPosts();
    } catch (error) {
        console.error('Error fetching posts:', error);
    }
}

function displayPosts() {
    console.log(allPosts);
}

// Call the function to fetch and log posts
fetchPosts();
If you want to fetch all your WordPress posts for analyzing how many posts were published per month during the year 2023, for example, use the following code snippet:
// Function to fetch and display post counts per month in the year 2023.

function fetchAndDisplayPostCounts() {
  const apiUrl = 'https://your-wordpress-site.com/wp-json/wp/v2/posts'; // Replace with your WordPress site URL

  // Make a request to the WordPress REST API
  fetch(apiUrl)
    .then(response => response.json())
    .then(posts => {
      const postCounts = {}; // Object to store post counts for each month

      // Iterate through posts and analyze publication dates
      posts.forEach(post => {
        const date = new Date(post.date);
        const year = date.getFullYear();
        const month = date.getMonth() + 1; // Months are 0-indexed, so we add 1

        // Only consider posts from the year 2023
        if (year === 2023) {
          const monthKey = `${year}-${month}`;
          postCounts[monthKey] = (postCounts[monthKey] || 0) + 1;
        }
      });

      // Display post counts on the webpage
      const resultContainer = document.getElementById('post-counts'); // Replace with the actual element ID
      resultContainer.innerHTML = '<h2>Posts published in 2023 by month:</h2>';

      for (const monthKey in postCounts) {
        const monthCount = postCounts[monthKey];
        resultContainer.innerHTML += `<p>${monthKey}: ${monthCount} posts</p>`;
      }
    })
    .catch(error => {
      console.error('Error fetching posts:', error);
    });
}

// Call the function to fetch and display post counts
fetchAndDisplayPostCounts();
Using PHP
In the same way as the previous JavaScript section, you can use the following example PHP code to retrieve all your WordPress posts, which will be printed in the console (but you can add onto the code to perform the desired actions).
<?php
// Set your WordPress site URL
$site_url = 'https://your-wordpress-site.com';

// Set the API endpoint
$api_endpoint = $site_url . '/wp-json/wp/v2/posts';

// Initialize an array to store all posts
$all_posts = [];

// Loop to retrieve posts using pagination
$page = 1;
$per_page = 10; // Number of posts per page
while (true) {
    $response = wp_remote_get("$api_endpoint?per_page=$per_page&page=$page");

    if (is_wp_error($response)) {
        // Handle errors if needed
        error_log('Error fetching posts: ' . $response->get_error_message());
        break;
    }

    $body = wp_remote_retrieve_body($response);
    $posts = json_decode($body, true);

    if (empty($posts)) {
        // No more posts, exit loop
        break;
    }

    $all_posts = array_merge($all_posts, $posts);
    $page++;
}

// Log retrieved posts to error log
error_log('Retrieved posts: ' . print_r($all_posts, true));
?>
That’s the pagination loop in PHP. Adapt it for backups, migrations, or any other bulk-read use case.
Also, if you want to use the data outside of WordPress, you can use other programming languages like Python or Java; whatever you’re using for development. The same principles of fetching data from the API apply.
How to fix common WordPress REST API errors
Working with the WordPress REST API is not always a smooth ride. Developers might encounter several issues, including HTTP error codes, authentication problems, Cross-Origin Resource Sharing (CORS) errors, rate limits, server configuration issues, and compatibility problems.
Common errors
- 404 error (Not Found Error): This error typically occurs when the requested resource cannot be found on the server. It’s often due to a typo in the endpoint URL or the requested resource not existing. To fix a 404 error, double-check your endpoint URL to ensure it’s correct. Also, verify that the resource you’re trying to access exists on your WordPress site.
- 500 error (Internal Server Error): This is a general-purpose error message indicating a problem with the server, but it doesn’t specify what the exact problem is. Debugging the server might help identify and fix the issue. Check your server’s error logs for any clues and ensure your WordPress installation and plugins are up-to-date.
- 403 error (Forbidden Error): When the server understands the request but refuses to authorize it, this alert occurs. It might be due to incorrect authentication credentials or permissions. To resolve this, check your authentication method and ensure your user role has the necessary permissions to perform the requested action.
Authentication methods
The WordPress REST API supports several authentication methods, each with its pros and cons;
| Method | How it works | Token revocation | External plugin needed | Best for |
| Cookie authentication | Standard WordPress login session, scoped to the same domain | Logout invalidates the session | None | Same-origin scripts (e.g., a custom WordPress admin page calling the API) |
| Application Passwords | 24-character per-application password generated in user profile, hashed with bcrypt | Per-application, individually revocable from user profile | None (built into WordPress core since 5.6) | Most automation, server-to-server scripts, CI pipelines, headless integrations |
| OAuth 2.0 | Authorization flow that issues access tokens without sharing user passwords | Token expiration with refresh, revocable per application | Yes (e.g., WP REST API OAuth1 plugin) | Third-party apps requesting permission to act on behalf of WordPress users |
| JWT (JSON Web Token) | Signed tokens passed in HTTP headers, no server-side session | Token expiration based on configured TTL | Yes (e.g., JWT Authentication for WP-API) | Single-page applications, mobile apps, server-to-server with short-lived tokens |

Update
An earlier version of this article framed Application Passwords as “less secure than OAuth or JWT.” That framing was misleading. Application Passwords use bcrypt hashing, are individually revocable per application, and are the WordPress core team’s recommended approach for most automation use cases since WordPress 5.6. The choice between these four methods is about workflow trade-offs (token lifetime, third-party delegation, user vs. application scope), not a flat security ranking. Pick the method that matches your integration’s threat model.
Cross-Origin Resource Sharing (CORS) errors
CORS is a security feature implemented by web browsers to control and restrict web page scripts from making requests to domains other than the one that served the web page.
CORS errors typically occur when you’re trying to make requests from a WordPress site hosted on one domain to another domain, such as when using the WordPress REST API to fetch data from a different site or when embedding content from external sources like YouTube or other web services.
If you have control over the external domain or API you’re trying to access, one solution to this is to try to configure CORS headers on that server to explicitly allow requests from your WordPress site’s domain. You can set headers like Access-Control-Allow-Origin to specify which domains are permitted.
When using the WordPress REST API, it’s important to ensure compatibility with different hosting environments and client technologies. Check that your hosting provider supports the necessary HTTP methods and that your client programming language (like JavaScript or PHP) can make HTTP requests and handle JSON responses.
It’s also good practice to always keep your WordPress version up-to-date as the REST API is continuously revised and improved.
Bringing it together
The REST API turned WordPress from a CMS into an integration platform. With the right pagination strategy, you can pull every post from a site of any size. The right authentication method depends on your use case: Application Passwords for most server-to-server automation, OAuth or JWT when you need to delegate access to third-party applications. The errors you’ll hit will mostly be 404s, 403s, and CORS issues, all of which have predictable fixes.
If you’re building integrations against multiple WordPress sites at once, the operational layer matters as much as the API layer. A site that’s down, or one that just had a plugin update break a custom endpoint, will silently break your REST API workflows. Worth thinking about as you scale.
FAQ: WordPress REST API
The WordPress REST API is an interface that enables external applications to interact with WordPress data remotely, allowing developers to retrieve, create, or update content outside of the WordPress dashboard.
Use the endpoint https://yourwebsite.com/wp-json/wp/v2/posts with optional parameters for pagination, sorting, and filtering.
No, authentication is not required for publicly available posts. However, for private posts or user-specific data, authentication is necessary.