How to Fix the “Installation Failed: Could Not Create Directory.” Error in WordPress
How to resolve the “Installation failed: could not create directory” error message so that your installation or update can be completed.

Are you trying to fix the “installation failed: Could not create directory.” error on WordPress?
Great! You’ve come to the right place.
“Installation failed, could not create directory.” is a relatively common error message that many WordPress users encounter.
Throughout this post, we’ll examine what causes this error and other issues associated with it.
Then, we will show you how to resolve the “Installation failed: could not create directory” error message so that your installation or update can be completed.
Let’s get the troubleshooting started!
What Is “Installation Failed: Could Not Create Directory”?
This error may occur due to an incorrect configuration of your WordPress file and folder permissions. File permissions must be set correctly in order for WordPress to create a plugin directory or theme folder.
If the permissions are not set correctly, WordPress won’t be able to create a new directory for installing a plugin or theme.
In all cases, the underlying cause is the same and you can resolve it using the same troubleshooting methods.
What Causes the “Installation Failed: Could Not Create Directory.” Error in WordPress
You might encounter the “Installation Failed: Could Not Create Directory.” error in WordPress in the following situations:
- New Theme or Plugin Installation: When you try to install a new plugin or theme, WordPress creates a new folder to store its files. If it lacks the permission to write to the directory, you’ll encounter this error.
- Updating an Existing Plugin or Theme: Similar to installing a new one, if WordPress can’t overwrite existing files and folder because of permission issues, you’ll see this error.
- Uploading Files to the wp-content Directory: If server permissions are improperly configured, you might still encounter this error even if you try to manually upload files.
Let’s dive closer in every of these situations!
New Theme Or Plugin Installation Issue
You can add a theme or plugin to your WordPress site, it creates a new folder in which its files are stored when you add a theme or plugin.
Nevertheless, if the plugin or theme doesn’t have permission to write to the root directory of your website, it won’t be able to complete this task. When this happens, you’ll see an error such as “Installation failed: could not create directory.”
By showing you this error, your server is telling you that adding the plugin or theme to your site is not allowed. Generally, this problem occurs on newly developed WordPress sites.
It’s important to note that there is a similar, less common cause for this error. If your server is running out of disk space to store your site’s files, it may show this same message because it has no room for the new plugin or theme.
Updating An Existing Plugin Or Theme
It is not uncommon to see an error very similar to the one we described above when attempting to upgrade a WordPress theme or plugin that has already been installed on your site.
It usually says, “Update failed: cannot create directory.”.
The causes of this problem are similar. Whenever you update a plugin or theme, WordPress needs to rewrite its files on the server. If you don’t have enough space or your permissions are incorrect, the process will not be able to access or upload the right files.
Both issues have the same cause, therefore, their solutions are also the same.
We will come to it in the paragraphs.
Uploading Files Directly to The wp-content Directory of WordPress
Hosting providers implement server permissions as a security feature to prevent unauthorized parties from making changes to your site.
Nevertheless, if they are not configured correctly, they can lock you out of your own files.
Thus, even if you upload plugins or themes directly to the wp-content directory on your server to get around the “Installation failed: could not create directory.” error in your WordPress dashboard, the problem will likely persist. The problem is not with your installation of WordPress, but with your server.
You will need to adjust your server’s settings to fix the problem.
Fixing the “Installation Failed: Could Not Create Directory” Error in WordPress?
Fortunately, this error is relatively easy to fix. It is important, however, that you check whether that solution is capable of solving your problem before you start working on it. So let’s go to the WordPress health check section of your site.
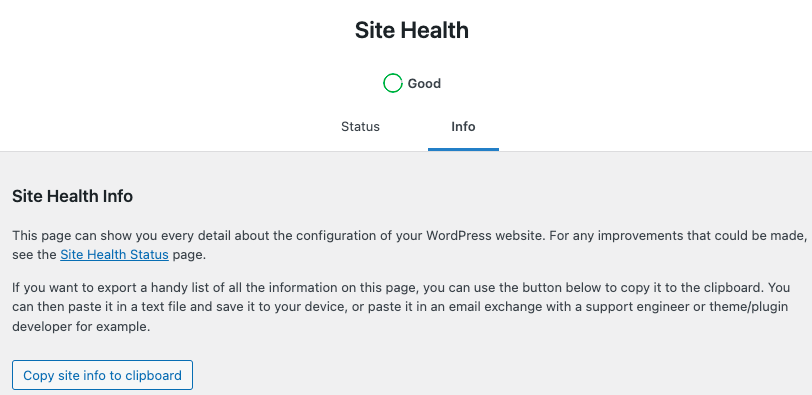
Step 1: Perform a Site Health Check
WordPress has a native health check system. Within it, you will find a wealth of useful information about the health of your website.
From your WordPress dashboard, navigate to Tools > Site Health and click on info.
Finally, scroll all the way down to the last section “Filesystem Permissions”.
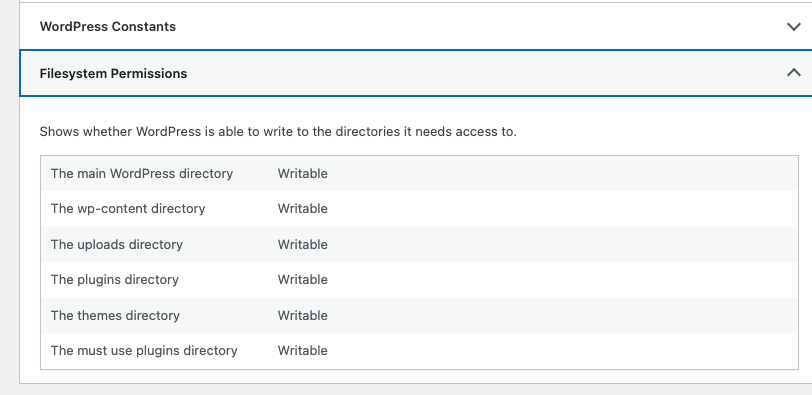
All should be listed as writable. You will see “Not writable” next to the problematic folders if your permissions are not configured correctly. Then your file permissions need to be corrected.
We will show you how, keep reading!
Step 2: Create A Backup
The first step is to create a backup of your entire website so that if anything goes wrong, you can restore it back to its original state.
You can easily create a backup of your website with WP Umbrella.

Install WP Umbrella from your WordPress admin, activate the plugin and create an account.
Then go to WP Umbrella’s application, click on your project and go to the backup tab.
From here, click on backup now and wait for your backup to be ready! Now let’s troubleshoot this!
Ready to boost your productivity, impress your clients and grow your WordPress agency?
Install WP Umbrella on your websites in a minute and discover a new way to manage multiple WordPress sites.
Get Started for free
Step 3: Edit Folder Permissions via FTP
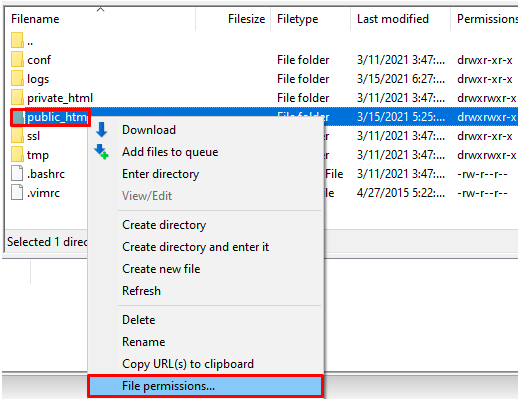
In order to connect remotely, you need to launch the FileZilla application and provide your server’s credentials.
Next, right-click (mouse) on the public_html folder and then, select the folders wp_content, wp_includes, and wp_admin.
Right-click on them and choose File Permissions:
Make sure the following options are set:
- Owner Permissions: Read, Write, Execute.
- Group Permissions: Read, Execute.
- Public Permissions: Read, Execute.
- Numeric value: 755.
- Apply to directories only.

You can now try to install or update the plugin/theme again on your website.
Step 3 Bis: Edit FTP Permissions In The “wp-config.php” File
In case the first option does not work, you might try changing the FTP permissions through the “wp-config.php” file. It is a very simple process.
- Open your web hosting account and click “File Manager”, or use your FTP client to access it.
- Navigate to the root directory of your website and open the “wp-config.php” file.
- Add the following code to your “wp-config.php” file:
define(‘FS_METHOD’, ‘ftpext’);
define(‘FTP_BASE’, ‘/pathtorootofyoursite/’);
define(‘FTP_USER’, ‘ftpusername’);
define(‘FTP_PASS’, ‘ftppassword’);
define(‘FTP_HOST’, ‘yoursite.com’);
define(‘FTP_SSL’, false);
Please ensure the information in brackets is replaced with your credentials.
Troubleshooting Checklist: Fixing the “Could Not Create Directory” Error
Here’s a quick checklist to guide you through the most effective solutions. Follow each step until the error is resolved:
- ✅ Verify Directory Permissions: Ensure your WordPress directories have the correct permissions. Use an FTP client or your hosting control panel to set permissions to 755 for folders and 644 for files.
- ✅ Check Disk Space on Your Server: Log in to your hosting dashboard to confirm there’s enough disk space available. Low storage can prevent WordPress from creating new directories.
- ✅ Try Installing Manually via FTP: If you’re still facing issues, consider installing the plugin or theme manually. Download the files to your computer, and upload them to the correct directory using an FTP client.
- ✅ Use Your Hosting Control Panel (For Kinsta, Bluehost, SiteGround users): Most hosting providers offer file management tools in their control panels. Access these tools to adjust file permissions or upload files directly, bypassing WordPress’s internal installer.
- ✅ Check for Plugin Conflicts: Deactivate all plugins temporarily and try the installation again. Sometimes, a plugin conflict can cause issues with directory creation.
- ✅ Check .htaccess File for Restrictions: Open your .htaccess file and ensure there are no restrictions blocking directory creation. Look for any unexpected rules or directives that may interfere with installations.
- ✅ Contact Your Hosting Provider’s Support Team: If none of the above steps work, reach out to your hosting provider. They may be able to resolve permission issues or adjust server settings on your behalf.
Conclusion
We hope this guide helped you resolve the ‘Installation Failed: Could Not Create Directory.’ error in WordPress.
This issue usually stems from incorrect file and folder permissions, but with the right adjustments, you can quickly get back to managing your website.