3 Easy Ways to Protect WordPress Media Files
Discover effective ways to protect your WordPress media files. From password protection to role-based restrictions, ensure your digital assets are safe from unauthorized access.
Are you interested in protecting your WordPress media files?
The Internet offers many benefits, including file sharing. In some cases, though, you don’t want to share all your files, especially PDF files.
When using WordPress, you can prevent media files from being shared in ways you don’t want them to be.
Let’s jump right into learning how to protect files on your WordPress site.
TL;DR
- Password Protection: Quick and easy, but not the most secure.
- Membership Restrictions: Great for subscription-based services but requires a plugin.
- .htaccess Method: Technical but robust for advanced users.
Why Protect Media Files in WordPress?
You may want to protect your WordPress PDF files, or any other file or folder, for many reasons.
It is always a good idea to protect your original content, digital assets, ideas, inventions, and intellectual work. Your hard-to-produce products and skills shouldn’t be exploited.
In addition, there are some personal and private documents you simply don’t want released.
In terms of protecting and stopping unwanted users from accessing your files, there are many different approaches depending on your needs and circumstances.
Understanding your reasons for protecting WordPress media files is the first step in deciding the most effective approach to take.
Let’s take a look at threee ways you can secure WordPress files.
How Can WordPress Protect Media Files?
Let’s explore some methods to protect WordPress files, each with its own set of advantages and limitations.
Ready to boost your productivity, impress your clients and grow your WordPress agency?
Install WP Umbrella on your websites in a minute and discover a new way to manage multiple WordPress sites.
Get Started for free
Method 1: Password-Protect WordPress Media Files
Did you know that you can password protect WordPress media files without having to install any additional plugins?
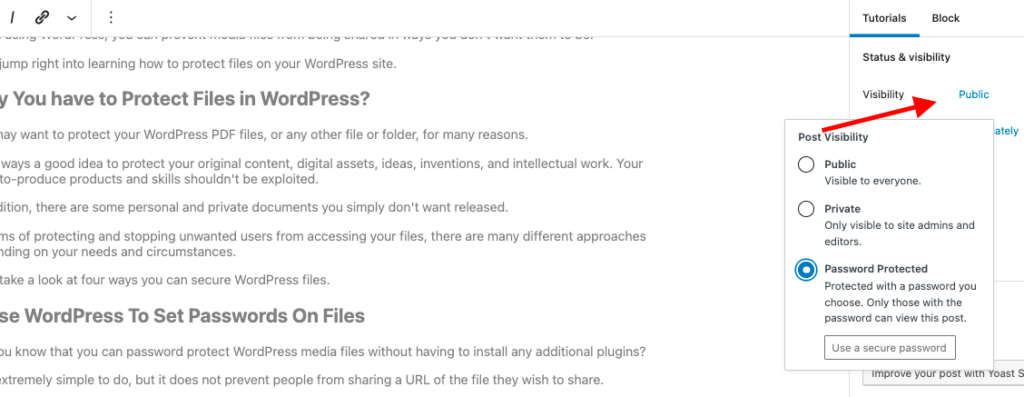
It is extremely simple to do, but it does not prevent people from sharing a URL of the file they wish to share.
This is a simple 4 steps process:
- Create a new page or post
- Copy/paste the link from your media uploads directory
- Change the page or post Visibility to Password protected
- Choose a password and click on update.
It’s over! Users can access the page & files by simply entering the password.
Due to the fact that it is a direct link to your wp-content/uploads, it won’t be very secure. If someone guesses the password to the page or shares the link, your files could be compromised.
Method 2: Restrict Private Content Access to Member Only
How can WordPress restrict access to media files? One robust method is to limit access to specific user roles or membership levels. This is particularly useful for e-commerce or membership sites.
Using this method is more complex, but comes in handy if you have a membership or e-commerce site.
If this is the case, you may want to create a member-only section where only your customer or paid member can access your private documents and content.
Using a membership plugin is all that is required.
Among all membership plugins available for WordPress, Ultimate Member is my favorite because of its simple logic and UI.
How to restrict private content access with Ultimate Member:
- Install and activate the plugin from WordPress.
- Create a new WordPress page/post.
- At the bottom of the page, you’ll find “UM Content Restriction” section.
- From here, just define who can access this content.
Method 3: Use .htaccess to Protect WordPress Files
First of all, you need to create a backup of your .htaccess file.
Then, Open the .htaccess file in the root folder of your WordPress site and edit it with this piece of code:
<IfModule mod_rewrite.c>
    RewriteEngine On
    RewriteCond %{HTTP_COOKIE} !.*wordpress_logged_in.*$ [NC]
    RewriteCond %{REQUEST_URI} ^(.*?/?)wp-content/uploads/.* [NC]
    RewriteRule . http://%{HTTP_HOST}%1/wp-login.php?redirect_to=%{REQUEST_URI} [L,QSA]
</IfModule>
This will prevent the access to wp-content/uploads to users that are not logged.
If you also want to prevent people from hotlinking your media files, scroll to the end of the .htaccess file and add this code:
RewriteCond %{HTTP_REFERER} !^$
RewriteCond %{HTTP_REFERER} !^http(s)?://(www\.)?yourwebsite.com [NC]
RewriteCond %{HTTP_REFERER} !^http(s)?://(www\.)?google.com [NC]
RewriteCond %{HTTP_REFERER} !^http(s)?://(www\.)?facebook.com [NC]
RewriteCond %{HTTP_REFERER} !^http(s)?://(www\.)?twitter.com [NC]
RewriteRule \.(jpg|jpeg|png|gif)$ - [F]
It will prevent sites other than yours, Facebook, Twitter, and Google from accessing your images.
Additional Tips for Protecting WordPress Media Files
To maximize protection, you can follow these 3 best practices:
- Regularly Update Passwords: If using password protection, choose complexe and unique password and update them periodically to maintain security.
- Review Membership Access: For membership sites, review and update user access to ensure only authorized people have access to your files.
- Monitor Server Logs: If you suspect a hack, check any suspicious activity in your server logs to detect unauthorized access attempts.
Conclusion: Secure Your WordPress Media Files, Secure Your Peace of Mind
Protecting your media files in WordPress is essential for keeping your content private and secure.
With multiple methods available – password protection, membership plugins, or .htaccess file editing – you can choose the level of security that best fits your needs and coding abilities.
For ongoing management and security, WP Umbrella provides tools to help you monitor and protect your WordPress site. Proactive site management ensures your content is safe and only accessible to authorized users.