How to Fix Image Upload HTTP Error in WordPress – Step-by-Step Guide
Discover 8 easy solutions to fix the HTTP errors that occur when uploading images to WordPress.

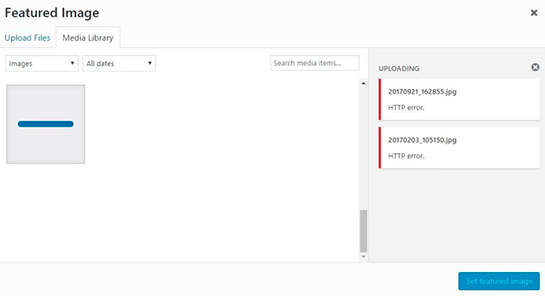
One of the most common issues WordPress users face is the “HTTP error” when attempting to upload images or other media.
This error is vague and doesn’t provide specific details, leaving users unsure of the cause. Hopefully, the HTTP error generally results from server limitations, plugin conflicts, or issues with image file size or format and is not so hard to troubleshoot.
In this guide, we’ll explore the reasons behind image upload errors in WordPress and provide a step-by-step approach to troubleshooting and resolving them.
What Causes the HTTP Error When Uploading Images in WordPress?
This image-related HTTP error can stem from various factors, including:
- Large image file size.
- Server limitations or configuration issues.
- Plugin or theme conflicts.
- Incorrect file permissions or outdated PHP versions.
Understanding these potential causes is the first step to resolving the issue. Let’s dive into specific methods to fix it.
8 Ways To Fix The HTTP Error When Uploading Images to WordPress
1. Refresh The Page & Clear The Browser Cache
Sometimes, the easiest solution is the best. Clearing the browser cache and refreshing the page might fix most of the HTTP errors you encounter on WordPress. Why refreshing the page in your browser?
You might have lost your connection temporarily during the upload, or your web host might have encountered a very brief downtime that prevents the server from processing your request.
Your login session may also be expired or you have perhaps tried to upload so many images, meanwhile overloading your server. Whatever, many HTTP Errors (401, 408, 429, 503, etc.) are often temporary.
Push F5 (Window) or cdm+R (Mac) and try to upload your media again.
If it doesn’t work, clear your browser cache (cdm+shift+R on mac) and try it again before going to the next step. You might have to login again.
2. Resize & Compress Images
HTTP errors can happen if your file size is too big. Reducing media size should be a top priority anyway. It’s an excellent way to improve your user experience (UX) and your ranking in Search Engines (SEO). It’s also very good for the planet.
There are a lot of image optimization plugins that can automatically do this for you when you upload something to the media library.
I personally use (and recommend) ShortPixel but Imagify and Smush are excellent too.
If resizing your media doesn’t work, you should try increasing the maximum upload file size. To do so, you need to edit the wp-config.php file.
3. Increase the Maximum Upload Images Size In WordPress
By default, the wp-config.php file is located in the root directory of your WordPress directory. Use your SSH or FTP client to download the file and open it.
Add these three lines of code at the end:
@ini_set( 'upload_max_size' , '20M' );
@ini_set( 'post_max_size', '15M');
@ini_set( 'memory_limit', '20M' );
Save your changes and upload again the edited wp-config.php file. Your file upload size has been increased. Try to upload the file again. If it doesn’t work, go to the next step!
4. Rename The Media Before Uploading It
A media upload can fail because of its name. Try to avoid accents and strange characters such as language symbols or apostrophes in your file names.
You also have to check that your filename is original and doesn’t already exist.
Note that an invalid URL is also the main cause of 400 Bad Request Errors, so you should always pay attention to the way you name your media on WordPress.
5. Deactivate Every Plugin And Theme
Themes and plugins can cause many HTTP errors and slow down your WordPress Website.
Start by deactivating every plugin and theme and upload again the file responsible for the HTTP error.
If the error remains, you can reactivate all your plugins and themes. I would however encourage you to use this opportunity to remove the plugins and theme that you are not using. It might speed up your website.
If the error vanished, activate one plugin and try to upload the image. Repeat the operation until you find the plugin or theme that was causing the HTTP error and reach out to their support.
If you want to speed up the process and find out which plugins are causing PHP errors. Check the PHP Error Monitoring tab of WP Umbrella.
Ready to boost your productivity, impress your clients and grow your WordPress agency?
Install WP Umbrella on your websites in a minute and discover a new way to manage multiple WordPress sites.
Get Started for free
6. Increase WordPress PHP Memory Limit
The PHP Memory Limit is different from the maximum upload file size. Increasing PHP memory available for WordPress to use might fix your HTTP error.
To increase your WordPress PHP Memory Limit you have to add this piece of code to your wp-config.php file.
define('WP_MEMORY_LIMIT','256M');It should be totally enough to fix any PHP memory limit issues.
7. Update PHP Version
You should always use the last PHP version available. If you are not using the last version of PHP, I recommend you to update it. It’s better for your website security and performance.
You can update your PHP version from your web host admin panel. Your hosting provider can certainly assist with this update.
8. Use GD Library Instead of Imagick
WordPress uses two different PHP modules to deal with images: Imagick and GD Library. Both of them are safe and well-functioning.
However, Imagick is more greedy in resources than GD Library, which can lead to WordPress HTTP errors if you are using a shared web hosting.
To switch from Imagick to GD Library you have to copy/past this code to your function.php file.
functionwpb_image_editor_default_to_gd( $editors){
$ gd_editor= 'WP_Image_Editor_GD;'
$ editors= array_diff( $editors, array( $gd_editor) );
array_unshift( $editors, $gd_editor);
return$editors;
}
add_filter( 'wp_image_editors', 'wpb_image_editor_default_to_gd');
If switching from Imagick to GD Libary didn’t fix your problem, make sure you delete the added code above from your files.
Images Upload To WordPress Issues: Final Thoughts
Unless other HTTP errors, image upload issues in WordPress are easy to fix. Some of the tips we provided you within this article include increasing the ability for WordPress to accept and process large media files.
Please keep in mind that this is not a sustainable way to do things from an SEO and User Experience perspective: you should always try to compress your content to improve load times.
I hope this article was helpful and helped you to fix the HTTP error when uploading images to WordPress.